

Chapter 5: Shaping Materials
From raw material to finished product — design, measure, cut, join and finish, with safety first.
Original notes — ready CBSE (NCERT, English Medium) • Class 9 • Skill Education • Book: Kaushal Vikas
Chapter 5: Shaping Materials — EG’s own notes, in simple words
Book: Kaushal Vikas (CBSE, Class 9) | Chapter 5 | Unit: Unit II: Work with Machines and Materials | Medium: English
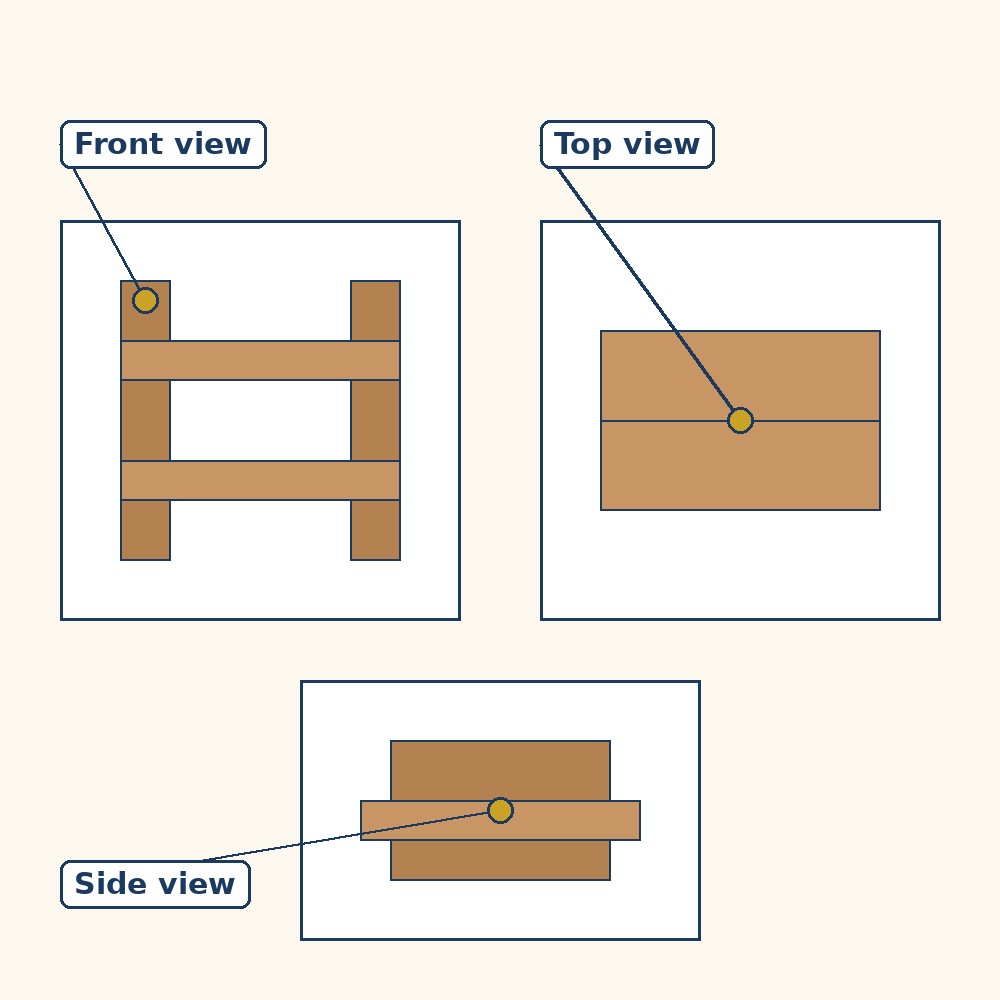
Diagram (labels are printed on the image): A technical drawing of a small rack: its front view, top view and side view, each drawn to show exact dimensions.

Working with wood and simple tools. A general picture about shaping materials; it is not a scene from the book.
What the chapter is about
India has a rich history of shaping materials to suit specific needs. Evidence from the Sindhu–Sarasvati civilisation shows houses built with bricks of the same size: Harappans mass-produced bricks of a standard size, ensuring perfect fit and uniform strength, by moulding wet clay and controlling firing (curing) in large kilns for hardness and durability. Intricate copper and brass objects, like the famous “Dancing Girl”, were created using casting. Knowledge of iron is equally old: a pillar of purified iron made in the fourth century CE, now standing in the Qutub Minar complex in Delhi, still has not rusted.
This chapter teaches the common ground beneath all such work. Different manufacturing processes shape raw materials into useful products, and though processes have become more specialised over thousands of years, some steps are common across fabric, cloth, leather, metals and plastics: design, measure and mark, cut and shape, join and assemble, finish and estimate. Master those, plus safety, measurement and technical drawing, and you can move between vocations — construction and apparel in detail (Chapters 6 and 7), and sheet metal work, plumbing, food processing, furniture making and pottery as guidelines (Chapter 8).
Processing material: from raw material to product
| Step | Fabric example | Wood example |
|---|---|---|
| Design | Draw the pattern with pencil or chalk | Draw the product to be made on paper |
| Measure and mark | Mark the pattern on fabric with chalk | Mark cuts and drilling points; hold wood with a vise |
| Cut and shape | Cut with scissors | Cut with a saw |
| Join and assemble | Use thread and needle, or a sewing machine | Use adhesive, hammer and nail |
| Finish and estimate | Ironing, trimming | Sanding, polishing and painting |
Choosing material for a specific product
The characteristics of a material determine whether it suits a use. Steel or aluminium is used for kitchen utensils, not plastic, because steel and aluminium tolerate high heat and are safe for cooking, while plastic melts when heated and is therefore unsafe. A sturdy object like a stool needs a material that can hold weight, such as wood or metal, whereas a reusable shopping bag needs something flexible and light, like jute fabric.
Environmental and weather conditions matter too: storage units or shelves in bathrooms are often made from steel, PVC or aluminium, not wood, because wood suffers in damp air. So material choice always answers three questions together: what must the product do, what can the material bear, and where will it live?
Three common skills: safety, measurement, technical drawing
1. Following safety protocols. Before beginning any work, read available manuals or instruction guides, and speak to your teacher and experts about safety precautions. Safety signage uses standardised colours, symbols and text to communicate potential hazards, required actions, the location of safety equipment and emergency procedures — its purpose is to prevent accidents and injuries with clear, easy-to-understand information. In the chapter’s colour table, red means fire and prohibition (fire extinguisher, stop buttons) and yellow means warning; learn the full table and the common symbols before you enter a workshop, and design your own symbols with colour and image both carrying meaning — a hot-surface warning, for example, must read even without words.
2. Taking measurements. Measurement is among the most important and basic skills for any work with materials. It is needed to estimate the exact amount of material required, to ensure minimal wastage, to reduce material costs, and to ensure the product meets required dimensions and quality standards. The instrument you choose depends on how accurate the measurement must be. The smallest value that can be measured accurately with an instrument is called its least count: a metre scale measures down to 1 mm, while vernier callipers can measure down to 0.02 mm, and so suit far more precise work. Match instrument to object: a pipe’s inner diameter needs callipers, a cloth length needs a measuring tape, and a classroom’s length needs a long tape — using the wrong one is itself an error.
3. Making technical drawings. Technical drawings carry dimensions of different parts and specifications of materials, enabling precise communication among designers, engineers and fabricators. That precision allows identical replication in large numbers without deviations: a set of dining chairs must share the same dimensions and shape, and plumbing in flats across floors of a multi-storey building must align so water and sewage flow smoothly. You have seen engineers referring to drawings at construction sites, tailors sketching patterns, and fabricators sketching before making a product — all are technical drawings conveying exact information visually. Technical drawing has its own symbols, like any language, and its standard views: front, top and side.
Selection of vocation, and working rules
This chapter helps you decide the vocation you will take up for work with materials: construction and apparel are covered in detail, with guidelines for sheet metal work, plumbing, food processing, furniture making and pottery. Before choosing, explore vocations around you — what work do you observe, what are its inputs, key processes and outcomes, and can you do it in school? — and map your resources.
When working with materials, remember: selection of material and manufacturing process depends on the characteristics of materials and the desired product; technical drawings help design the product and communicate with others involved; measurement tools are selected by what is to be measured and to what accuracy; safety comes first, with signs and symbols used wherever needed; and the workplace stays clean and organised to avoid accidents.
Key Terms
- Manufacturing process — A sequence of steps that shapes raw material into a useful product.
- Casting — Shaping metal by pouring molten metal into a mould (used for the “Dancing Girl”).
- Curing — Controlled firing or hardening that gives a material (like brick) its hardness and durability.
- Least count — The smallest value an instrument can measure accurately (metre scale: 1 mm; vernier callipers: 0.02 mm).
- Safety signage — Standardised colours, symbols and text that warn of hazards and show required actions and safety equipment.
- Technical drawing — A drawing giving exact dimensions and material specifications so others can replicate a product precisely.
- Front, top and side views — The standard views of a technical drawing, showing a product from three directions.
- Joining — Fixing parts together, for example with thread, adhesive, nails or screws.
- Finishing — Final treatment such as sanding, polishing, painting, ironing or trimming.
Remember
- Common steps for every material: design, measure and mark, cut and shape, join and assemble, finish.
- Material choice follows characteristics + product need + environment (heat, weight, damp).
- Safety signage: standard colours and symbols — red for fire and prohibition, yellow for warning.
- Least count decides the instrument: 1 mm for a metre scale, 0.02 mm for vernier callipers.
- Technical drawings let many people replicate one product identically, without deviations.
- Clean, organised workplaces and read manuals are safety rules, not tidiness tips.
Exam Tip / Common Mistake
Common mistake: describing a product failure as a cutting error when the steps show otherwise. An uneven wooden tray that does not stand flat usually traces back to measuring or marking — wrong dimensions, unmarked drilling points, or a design never drawn — so diagnose step by step from design onward.
- Shaping materials is ancient: Harappan standard bricks, cast bronze, and a rust-free fourth-century iron pillar.
- Every material follows design → measure and mark → cut and shape → join → finish.
- Choose material by characteristics, product need and environment — steel for heat, jute for light flexibility.
- Safety signage, least count and technical drawing are the three common skills beneath all vocations.
- Unit II vocations: construction and apparel in detail; sheet metal, plumbing, food, furniture and pottery as guides.
Practice set — try it yourself
- Why were Harappan bricks all the same size?
Hint: Perfect fit and uniform strength. - Why is plastic wrong for a cooking utensil, in one sentence?
Hint: Heat, melting, safety. - What is least count? Give the least counts of a metre scale and vernier callipers.
Hint: 1 mm and 0.02 mm. - List the five common steps of developing a product, in order.
Hint: Design comes before measuring. - Why must bathroom shelves avoid wood?
Hint: Damp air and the material it damages.
Questions with Answers
- What evidence shows India’s ancient skill in shaping materials?
Harappans mass-produced standard-size bricks by moulding wet clay and controlling firing in large kilns, giving perfect fit and uniform strength. The “Dancing Girl” shows intricate copper and brass casting, and the fourth-century purified-iron pillar in Delhi’s Qutub Minar complex still has not rusted. - What are the common processes for shaping materials?
Design; measure and mark; cut and shape; join and assemble; finish and estimate. For fabric: draw and chalk the pattern, cut with scissors, join with thread or machine, finish by ironing and trimming. For wood: draw on paper, mark cuts and drilling points, saw, join with adhesive, hammer and nails, and finish by sanding and polishing. - How do you choose a material for a product?
By its characteristics against the product’s needs and environment: steel or aluminium for cooking vessels (heat tolerance and safety, unlike melting plastic); wood or metal for a weight-bearing stool; light, flexible jute for a shopping bag; steel, PVC or aluminium — not wood — for damp bathroom shelves. - What is least count, and why does it decide your instrument?
The smallest value an instrument can measure accurately. A metre scale’s least count is 1 mm; vernier callipers’ is 0.02 mm, so callipers suit precise work like a pipe’s inner diameter, while a measuring tape suits cloth length and a long tape suits a classroom. - Why are technical drawings called the language of technicians?
Because, like a language, they use standard symbols and views (front, top, side) to communicate exact dimensions and material specifications. That lets designers, engineers and fabricators replicate products identically in large numbers — chairs of one size, plumbing aligned across floors — without deviation.
Extension Questions with Answers
- You have clay and wood for a pen stand. Which would you choose, comparing characteristics?
Wood, for most school use: it is sturdy, light, easy to cut, join and finish, and survives daily handling; clay must be shaped, dried and fired or hardened, and stays fragile and heavy for a desk object. Clay wins only if the aim is modelling practice or decoration rather than a durable stand. - Design a safety symbol for extremely hot surfaces. What colour and image would you use, and why?
A yellow warning triangle — yellow signals warning — carrying a simple hand-near-heat or flame image, readable without words. Colour and image must agree: red would wrongly suggest fire equipment or prohibition, while the flame-plus-heat image names the hazard itself. - Your teacher gives you a pipe’s inner diameter, a cloth length and a classroom’s length. Which instrument for each, and why?
Vernier callipers for the pipe’s inner diameter (precision to 0.02 mm, inside jaws for bores); a flexible measuring tape for cloth (follows fabric without stretching it, adequate accuracy); a long metre tape for the classroom (range matters more than fine precision there). - A group’s wooden tray is uneven and does not stand flat. Using the common steps, what could have caused it?
Work backwards: an unlevel finish or poor joining can show unevenness, but the likeliest roots are design (never drawn to size), measuring (wrong dimensions) or marking (cuts marked without a vise or square). Correct the earliest faulty step, not just the visible wobble, or the next tray repeats it. - Why does a technical drawing show front, top and side views instead of one pretty picture?
Because one view hides dimensions: height and width may show in front view while depth needs the side view and the plan needs the top view. Only all three together let another person cut, join and assemble the identical product without guessing.
How to use this page: Read the summary, say the Key Terms in your own words, then try the practice set without looking. Use the Questions with Answers to check yourself afterwards. Ask your teacher or parent to check your answers.